By default, IP and DNS addresses are automatically assigned to users. However, certain types of malware can modify these settings and the user will see random IP and DNS addresses.
In this case, it is necessary to change the TCP / IP parameters by following the following steps:
- Access network connections
For Windows 10 users:
- Click on the Windows logo in the lower left corner of the screen.
- Type Show network connections, then click Show network connections.
For Windows 8 / 8.1 users:
- Click on the Start button.
- Type Show network connections, then click Show network connections.
For Windows 7 users:
- Click the Start button, then select Control Panel.
- In the search field located in the upper right corner of the window, type adapter.
- Then select View network connections, located in the Network and Sharing Center.
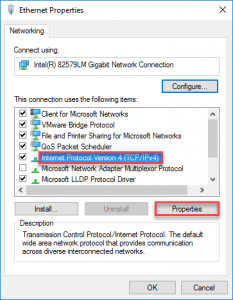
- Right click on the connection you want to modify and select Properties.
NOTE: In some cases, it will be necessary to enter the administrator password or to confirm. If necessary, enter the administrator password or click on the confirmation.
- On the Networks tab, under This connection uses the following items, click Internet Protocol version 4 (TCP / IPv4).
- Click Properties.
NOTE : Do not uncheck the box next to Internet Protocol version 4 (TCP / IPv4).
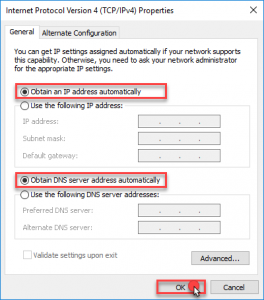
- Delete all unknown elements: IP addresses, subnet masks, default gateways and DNS servers.
- Click Obtain an IP address automatically.
- Click Obtain DNS server addresses automatically.
- Click on OK.
About the author
DMTwebhosting.com’s Editorial Team prides itself on bringing you the latest web hosting news and the best web hosting articles!
You could also link to the news and articles sections:
http://www.DMTwebhosting.com/blog


